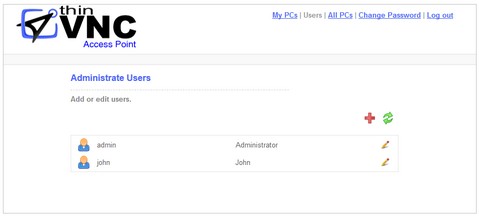
1. Click on the "Users" option in the top-right corner menu.
** If you don't see the "Users" options in the menu, it is probably because you have logged in with a non "Admin" user account.
2. You will see here a list of the users you have added already.

3. To edit one of these users, click on pencil symbol (edit button), located by the side of the user you want to modify.

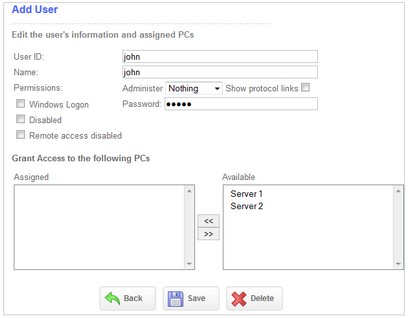
4. Modify the information you want to change. Find below an explanation to each one of the forms field.
User ID |
Enter the user's ID. You can choose to enter the user's Windows ID and then check the 'Use Windows Logon' option or you can create a new username for ThinVNC Access Point. |
Name |
Enter a descriptive name for this person. |
Administer |
Choose the permission level for this user: • Nothing:Choose this option if you want the user to only be allowed to access the computers an administrator selects for them. • Full Admin:Choose this option if you want the user to be able to add, remove and assign other users and computers. |
Show protocol links |
Choose this option if you would like to provide the user with the possibility of accessing through RDP or ThinVNC, if available. When unchecked, the user will only access each PC through its default protocol. |
Windows Logon |
Check this option if you want the user to enter their Windows credentials to log into ThinVNC Access Point. Remember that for this option to work you need to enter a valid Windows username in the 'User ID' field, including the domains. |
Password |
If you haven't selected the 'Use Windows Logon' option, choose a password for the user. |
Disabled |
Choose this option to disable the user. You can enable the user again by un-checking the option. |
Remote access disabled |
Choose this option to restrict the user to access ThinVNC Access Point only locally: only from the computer where ThinVNC Access Point is installed. |
5. You can assign the computer connection permissions to the user right after saving it.
a. Select the computer you want to assign permission from the "Available" list
b. Move it to the "Assigned" list to grant the user permission to access the computer. Use the arrows to move it from one list to another.
6. When you are done, press "Save". If you don't want to save the changes, press "Back".