|
| For the installation of the z/Scope Remote Configuration Server configuration utility follow these steps:
|
|
|
| 1. Downloading the Installation Package
|
|
|
| The first step is to download the installation package from:
|
| http://www.cybelesoft.com/downloads/zrsetup.exe
|
|
|
|
|
| 2. Following the Installation Wizard
|
|
|
| Once you have the .exe setup file in your disk, you can run it and start choosing the options from its screens:
|
|
|
| 2.1 Welcome Screen
|
| This screen shows the product name and makes a recommendation for you to close all other applications before continuing. Click "Next".
|
|
|
| 2.2 License Agreement
|
| This screen shows the entire license agreement which you must read and accept in order to continue. Once you've done so, please click on "I accept the agreement" and then click on "Next".
|
|
|
| 2.3 Select Destination Location
|
| In this step you can select a directory to install the software. Usually it's installed along with other programs in the "C:\Program Files\zScope\Remote Configuration Server" folder, but you have the option to choose another directory. Then click "Next".
|
|
|
| 2.4 Installation Options
|
| If you are going to use Internet Information Server to make zScope's configuration available through a network or the web, please keep the "Create Virtual Directory in IIS" check box on, and choose a descriptive name for this connection. It can be zScopeRCS or any other of your choice. Then click "Next".
|
| If you are not going to use Internet Information Server, please check off the "Create Virtual Directory in IIS" field and then click "Next".
|
|
|
| 2.5 Shortcuts Directory
|
| In this screen you can choose where to place the z/Scope Remote Configuration Server shortcuts inside the Start Menu.
|
|
|
| 2.6 Ready to Install
|
| This screen shows a summary of your selections through the Wizard. If they are correct, please click on "Install". Otherwise you can go back to change any of the settings in the previous screens.
|
|
|
| 2.7 Installing
|
| This screen shows an information bar with the progress of the installation. Please wait until it's finished.
|
|
|
| 2.8 Finish
|
| When the installation is complete, you can click on "Finish" to exit the Setup Wizard.
|
|
|
|
|
| 3. Linking z/Scope Remote Configuration Server to the web directory
|
|
|
| If you are using Internet Information Server and left the option in step 2.4 checked, this is already done and you can skip this step. A directory with the name chosen in step 2.4 will be created inside the Default Web Site. You may want to verify whether the default website is running correctly in case there are any problems.
|
|
|
| If you haven't used Internet Information Server, you need to configure the web server of your choice separately.
|
|
|
| Afterwards, please point it to the vdir directory inside the C:\Inetpub\zScopeRCS.
|
|
|
|
|
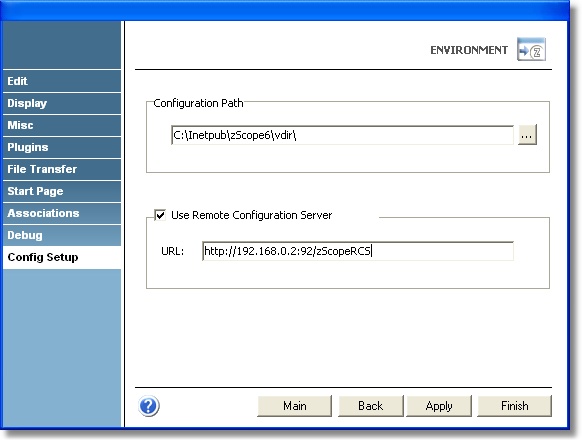
| 4. Using z/Scope Remote Configuration Editor.
|
|
|
| To enable the remote configuration in your z/Scope edition, go to Options - Configuration Settings under the main menu. Click on 'Environment' and in the 'Config Setup' tab, click on the 'Use Remote Configuration Server' check box. Write in the 'URL' field the URL of the web server where you have placed the Remote Configuration Server, chosen in step 3. For example:
|
|
|
|
|
|
|
|
|
|
|
| For any additional question, please contact us by email at support@cybelesoft.com.
|
|
|
|
|
|
|
Copyright © 2002-2009, Cybele Software Inc. All rights reserved.
|