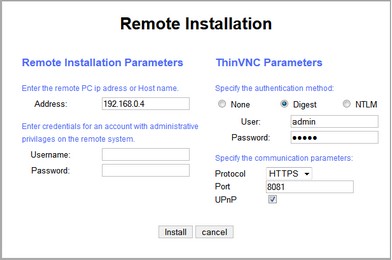
ThinVNC Access Point allow you to perform a ThinVNC Remote Installation on the LAN PC's. This feature can be very useful when you have many computers to install in the LAN, since you don't have to go physically to each one of the computers in order to have ThinVNC installed on them.
1. Click on the "All PCs" option in the top-right corner menu.
** If you don't see the "All PCs" options in the menu, it is probably because you have logged in with a non "Admin" user account.
2. You will see here a list of all PC's you have defined. Click on pencil symbol (edit button), located by the side of the PC you want to install ThinVNC on.
3. Click on the "Remote Install button".

4. Enter the Remote Installation Parameters. Access Point will use this information to connect itself with the remote computer in order to install ThinVNC.
Address |
Enter the address of the PC you want install ThinVNC. |
UserName |
Enter the username credential for an account with administrative privileges on the remote system. |
Password |
Enter the password for the account informed on the username field.. |
5. The ThinVNC Parameters on the right column are presented with the default parameters. If you want the remote ThinVNC installation to work differently from the defaults, you can set them up before the installation starts. You can later on configure these same parameters through the remote computer ThinVNC settings tool.
6. Click on the "Install" button and wait the installation to finish.
7. After that, Test the ThinVNC connection.