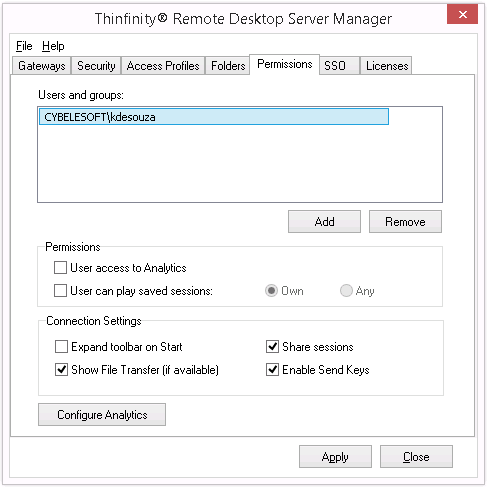
In the Thinfinity® Remote Desktop Server manager 'Permissions' tab you will find the following options:
Users and Groups |
List with the users and groups to grant permissions to. |
Add |
Adds a new Active Directory user or group into the Permissions list. |
Remove |
Select a listed user/group and click on the 'Remove' button to take all of its previous permissions and remove it from the list. |
User access to Analytics |
Select a user from the list and check this option to give him/her access to the Analytics feature. |
User can play saved sessions |
Check this option to enable users to see remote sessions that have been recorded. Read more about Saved Sessions. |
Own / Any |
If the 'User can play saved sessions' option is checked, choose to allow the use to see any recorded sessions or only those recorded by themselves. Read more about Saved Sessions. |
Expand toolbar on Start |
Through this option you can configure whether the connection toolbar should start expanded or closed for the selected user on the list. |
Show File Transfer (if available) |
If you check this option the selected user will have access to the File Transfer feature (downloads and uploads). |
Share Sessions |
This checkbox allows you to grant the selected user permission to use the Share Session feature. |
Enable Send Keys |
Uncheck to remove the Send Keys options from the Thinfinity® Remote Desktop Server toolbar. |
Configure Analytics |
Press this button to access the Analytics Database Options. |
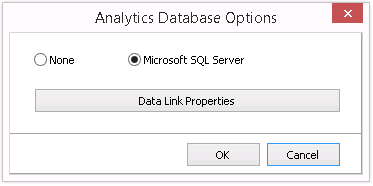
Access this options dialog by pressing the 'Configure Analytics' button.

None / Microsoft SQL Server |
Set this option to 'None' to use Thinfinity Remote Desktop Server's database format as backend for Analytics. Set this option to 'Microsoft SQL Server' to use MS SQL Server as backend for Analytics. |
Data Link Properties |
This button is only enabled when 'Microsoft SQL Server' is selected. Press this button to access the Microsoft SQL Server Data Link Properties. Learn how to configure MS SQL Server as backend. |
Always remember to press 'Apply' in order to save the changes.