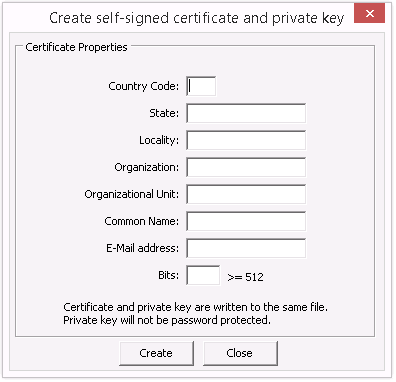
This option is used to create your own self-sign certificate.
1. Go to the Thinfinity VirtualUI Server Settings 'Security' tab.
2. Press the 'Manage certificate' button.
3. Press the 'Create a self-signed certificate' button.
4. Fill in the form below with your organization data:

Country Code |
The two letter country code of the International Organization for Standardization (ISO 3166) |
State |
Full unabbreviated name of the state or province your organization is located. |
Locality |
Full unabbreviated name of the city where your organization is located. |
Organization |
The name your company is legally registered under. |
Organizational Unit |
Use this field to differentiate between divisions within an organization. |
Common Name |
The domain name or URL you plan to use this certificate with. |
E-Mail Address |
Company e-mail address. |
Bits |
We recommend using a 2048 length key. |
5. The 'Common Name' field should be filled with the server+domain that will be used to access Thinfinity VirtualUI Server (ThinfinityVirtualUI.mycompany.com).
6. Press 'Create'.
7. Select the location where you want the certificate to be stored.
8. The application will start using this self-signed certificate created by you.
|
Because this certificate is not issued by a known Certificate Authority (CA), the web browsers will warn you they can not verify its authority. |
Read more: