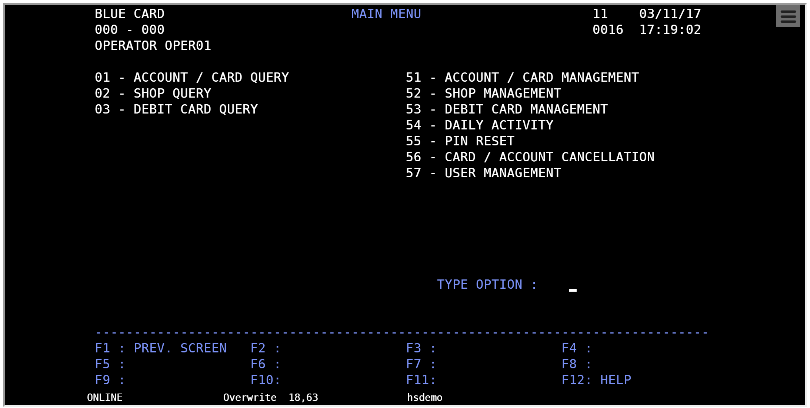
In this topic we will define two rules, the first one to detect the screen below, and a second to detect and process the "ACCOUNT / CARD QUERY".

Please note that the first step is to decide the text or pattern to compare with. This will be set in the 'match' property of the new HostSurfer rule for this screen. In this case we will use the text 'MAIN MENU' that uniquely identifies this screen ('BLUE CARD', for example, is not a suitable identifying pattern because previous screen has the same literal text in the same position of the screen).
Therefore, one possible proper 'match' property is:
match : [{ 'text': 'MAIN MENU', 'row': 1, 'col': 35 }],
Next, we will proceed to define the 'apply' property of the new rule.
There is only one field required in the 'fields' property. This is the menu "option" entry field and its label is "TYPE OPTION" (as mentioned previously, all screen fields are retrieved and made available by HostSurfer automatically with a default name, but in this example application we want to use an explicitly name field).
As a result, our 'fields' property will look as follows:
fields : [
{ name : 'option', row : 18, col : 63, len : 2 }
]
Finally, we need to define the 'actions' property of 'apply'. Just two actions are needed: 'main' and 'logout'. Both of these actions serve to the purpose of "bypassing" this screen.
The 'main' action will be called implicitly as a result of a 'chained' navigation from the 'signin' web page. The other one, 'logout', will also be called implicitly by a chained navigation from the next web page (the one we will define on the next topic).
The 'actions' property will be declared as follows:
actions : {
main : function (hs) {
hs.data.option = "01";
hs.send.enter();
},
logout : function (hs) {
hs.send.pf1();
}
}
Please note that the 'main' action function value will:
1. Assign a "01" value to the 'option' field (as if the user typed "01")
2. Send an <Enter> keystroke, as if the user accepted the typed option.
In a similar way, the 'logout' action will send a "PF1" keystroke, as if the user had pressed the PF1 key. If you look at the screen capture at the beginning of this topic, the F1 key is assigned as the command to return to the previous screen.
The following code snippet shows the entire HostSurfer rule, as it was defined:
(function () {
var _mainmenu = {
id: 'mainMenu',
match : [{ 'text': 'MAIN MENU', 'row': 1, 'col': 35 }],
apply : {
fields : [
{ name : 'option', row : 18, col : 63, len : 2 }
],
actions : {
main : function (hs) {
hs.data.option = "01";
hs.send.enter();
},
logout : function (hs) {
hs.send.pf1();
}
}
}
};
zScope.hostSurfer.register(_mainmenu);
})();
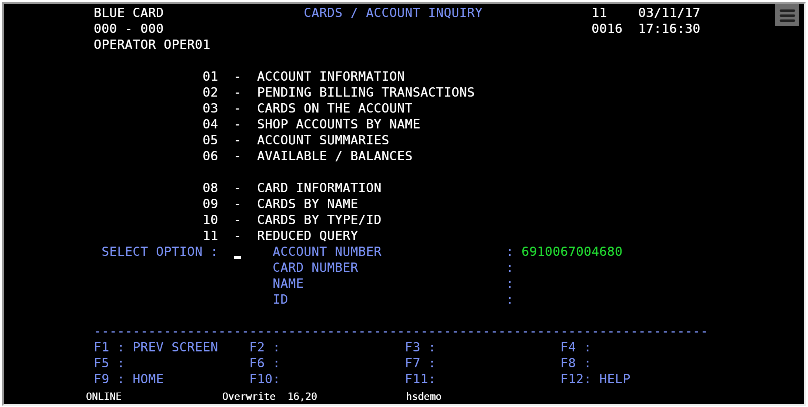
Now, we need to define a new HostSurfer rule, this time to show a web page that will correspond to the terminal screen that is shown below and results from accepting the "01" option in the "MAIN MENU" screen.

The 'match' condition will be based on screen title "CARDS / ACCOUNT INQUIRY", therefore we will express the match condition as follows:
match: [{ text: 'CARDS / ACCOUNT INQUIRY', row: 1, col: 29 }],
We will also define a set of named fields, as follows:
{ name: 'option', row : 16, col : 20, len : 2 },
{ name: 'accountNumber', row : 16, col : 57, len : 22 },
{ name: 'cardNumber', row : 17, col : 57, len : 22 },
{ name: 'name', row : 18, col : 57, len : 22 },
{ name: 'idNumber', row : 19, col : 72, len : 8 }]
Finally, we will define just one 'actions' property, 'logout', as shown in the following code snippet:
actions: {
logout: function (hs) {
hs.send.pf9();
}
}
The page declaration will be:
page: '#!cardsaccount',
The whole HostSurfer rule is declared as follows:
(function () {
var _cardsaccount = {
id: 'cardsAccount',
match: [{ text: ' CARDS / ACCOUNT INQUIRY', row: 1, col: 26 }],
apply: {
fields: [
{ name: 'option', row: 16, col: 20, len: 2 },
{ name: 'accountNumber', row: 16, col: 57, len: 22 },
{ name: 'cardNumber', row: 17, col: 57, len: 22 },
{ name: 'name', row: 18, col: 57, len: 22 },
{ name: 'idNumber', row: 19, col: 72, len: 8 }],
page: '#!cardsaccount',
actions: {
logout: function (hs) {
hs.send.pf9();
}
}
}
};
zScope.hostSurfer.register(_cardsaccount);
})();
Once the rules are defined, the file hsangular.js must be modified, so that:
1. The HostSurfer instance can load the rules files in run time.
2. The AngularJS route provider is aware of the page for each route.
The following listing shows the contents of hsangular.js, for the existing set of rules:
var hs = zScope.hostSurfer;
hs.init("rules/", ["signin","mainmenu","cardsaccount"]);
var app = angular.module('hs', ['ngRoute']);
app.controller('hscontroller', function ($scope) {
$scope.hs = hs.data;
hs.on('fldupdate', function () {
$scope.$apply(function () {
$scope.hs = hs.data;
});
});
});
hs.on('ready', function () {
hs.defaultPage = "#!";
angular.bootstrap(document, ['hs']);
});
app.config(function ($routeProvider) {
$routeProvider
.when("/signin", { templateUrl: 'signin.html', controller: 'hscontroller' })
.when("/cardsaccount", { templateUrl: 'cardsaccount.html', controller: 'hscontroller' })
.otherwise({ redirectTo: '/' });
})
A detail that deserves attention is that, while all rules are registered to the instance of HostSurfer, it is not so when configuring $routeProvider routes (as there is not a template page associated with 'mainmenu').
Please note that the web page that corresponds to this screen is not intended to expose any useful functionality, but just to demonstrate how HostSurfer manages page navigation.
The cardsaccount.html web page will be defined in the next topic, Adding a new Web Application Page .