For a complete description of the elements of z/Scope's FTP workspace, you may want to check the following section:
To learn how to get started setting up FTP connections, check the following topics:
In this topic, file transfer operations from within the FTP workspace will be discussed. There are 3 ways in which you can start a file transfer:
1. Using the FTP toolbar buttons
![]()
![]()
To start a file transfer using the FTP toolbar Upload/Download buttons, follow these steps:
| • | If you want to upload files from your local computer to the remote computer: |
1. Select the file/s you want to upload from the 'My computer' panel.
2. Select the appropriate path in the 'FTP server' panel for the file/s to be saved.
3. Click on the 'Upload' button in the FTP toolbar.
The file/s you selected will be placed in the queue and the transfer will be started automatically into the selected folder in the FTP server panel.
| • | If you want to download files from the remote computer to your local computer: |
1. Select the file/s you want to download from the 'FTP Server' panel.
2. Select the appropriate path in the 'My computer' panel for the file/s to be saved.
3. Click on the 'Download' button in the FTP toolbar.
The file/s you selected will be placed in the queue and the transfer will be started automatically into the selected folder in the My computer panel.
2. Using Drag & Drop between panels

To start a file transfer using the drag and drop method, follow these steps:
| • | To upload files from your local computer to the remote computer: |
| 1. | Select the file/s you want to upload from the 'My computer' panel. |
| 2. | Select the appropriate path in the 'FTP server' panel for the file/s to be saved. |
| 3. | Drag and drop the file/s from the 'My computer' panel to the location selected in the previous step. |
The file/s you selected will be placed in the queue and the transfer will be started automatically.
|
Optionally, you can drag and drop the file/s to the 'File Transfer Queue' instead of the 'My Computer' panel. In this way, the transfer will be queued until you choose to start it, as described in method #3 ('Starting a previously queued transfer'). |
| • | To download files from the remote computer to your local computer |
| 1. | Select the file/s you want to download from the 'FTP Server' panel. |
| 2. | Select the appropriate path in the 'My computer' panel for the file/s to be saved. |
| 3. | Drag and drop the file/s from the 'FTP Server' panel to the location selected in the previous step. |
The file/s you selected will be placed in the queue and the transfer will be started automatically.
|
Optionally, you can drag and drop the file/s to the 'File Transfer Queue' instead of the 'My Computer' panel. In this way, the transfer will be queued until you choose to start it, as described in method #3 ('Starting a previously queued transfer'). |
3. Starting a previously queued transfer

You can drag and drop any file to the 'File Transfer Queue' so that the transfer remains queued until you choose to start it.
| • | To start a previously queued transfer, do the following: |
| 1. | Right-click on the file in the queue that you want to start transferring. |
| 2. | Select the 'Start' option from the context menu. |
The selected file will start transferring instantly.
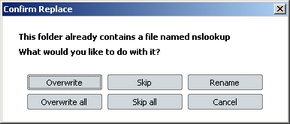
When you attempt to transfer files that already exist in the destination folder, the following dialog will be displayed:

Overwrite
Select this option if you want to overwrite the destination file with the new one.
Overwrite all
Select this option if you are transferring many files at the same time and you don't want to be asked again for confirmation if a file with the same name already exists in the destination folder. Files in the destination folder will be overwritten.
Skip
Select this option if you are transferring many files at the same time and you don't want to overwrite the existing file with the new one.
Skip all
Select this option if you are transferring many files at the same time and you don't want any of the existing files to be overwritten by the new ones.
Rename
Select this option to rename the new file so that the existing one won't be overwritten.
Cancel
Select this option to discard the whole transfer process.