The following image shows the resultant screen after navigating from the login page by using the "Sign in" button:
This screen contains four sections: a header, a menu with options, an input section with several editable fields and a footer with some navigation options. The menu section contains several rows displaying each row an option. We will take advantage of this vertical disposition to recover dynamically all menu options. Please, pay attention to the code highlighted in yellow:
zScope.hostSurfer.register({
id: 'bluecardAccountMenu',
match: [{ text: 'CARDS / ACCOUNT INQUIRY', row: 1, col: 29 }],
apply: {
fields: [
{ name: 'option', row: 16, col: 20, len: 2 },
{ name: 'account', row: 16, col: 57, len: 22 },
{
name: 'options', fromRow: 5, toRow: 15,
items: [
{ name: 'value', col: 16, len: 2 },
{ name: 'description', col: 23, len: 40 }
],
skip: function (obj) { return (obj.value == ''); },
break: function (obj) { return false; }
}
],
}
});
The highlighted code tells HostSurfer to scan rows from 5 to 15, skipping the empty fields and retrieving the 'value' and 'description' fields. Now, when you navigate to the Blue Card Account Information menu, you will get the following fields as a Javascript objects array called 'options':
options: [
{"value": "01", "description": "ACCOUNT INFORMATION" },
{"value": "02", "description": "PENDING BILLING TRANSACTIONS" },
{"value": "03", "description": "CARDS ON THE ACCOUNT" },
{"value": "04", "description": "SHOP ACCOUNTS BY NAME" },
{"value": "05", "description": "ACCOUNT SUMMARIES" },
{"value": "06", "description": "AVAILABLE / BALANCES" },
{"value": "08", "description": "CARD INFORMATION" },
{"value": "09", "description": "CARDS BY NAME" },
{"value": "10", "description": "CARDS BY TYPE/ID" },
{"value": "11", "description": "REDUCED QUERY" }
]
To complete this rule definition, we need to declare the rule actions and the corresponding page template.
To exit this screen we need to press PF1 key, but as we want to bypass the "Main Menu" we'll define an 'exit' action to send a PF9 key that will make a logout and in turn, will chain with the "exit" action of the Login screen, exiting completely the application. We also define a "logout" action that will only navigate to the login screen.
The complete rule definition looks like:
hs.register({
id: 'bluecardAccountMenu',
match: [{ text: 'CARDS / ACCOUNT INQUIRY', row: 1, col: 29 }],
apply: {
fields: [
{ name: 'screenTitle', row: 1, col: 29, len: 30,
get: function (value) { return value.toLowerCase().replace(/\b\w/g, function (i) { return i.toUpperCase() }) } } },
{ name: 'option', row: 16, col: 20, len: 2 },
{ name: 'account', row: 16, col: 57, len: 22 },
{
name: 'options', fromRow: 5, toRow: 15,
items: [
{ name: 'value', col: 16, len: 2 },
{ name: 'description', col: 23, len: 40 }
],
skip: function (obj) { return (obj.value == ''); },
break: function (obj) { return false; }
},
{
name: 'inputFields', fromRow: 16, toRow: 19,
items: [
{ name: 'caption', col: 25, len: 30 },
{ name: 'value', col: 57, len: 22 }
],
skip: function (obj) { return (obj.value == ''); },
break: function (obj) { return false; }
}
],
actions: {
logout: function (hs) { hs.pf9(); },
exit: function (hs) { hs.pf9(); }
},
render: {
view: {
template: 'accountmenu.html'
}
}
}
});
Note that the 'screenTitle' field has a "getter" function. This allows to return a custom value. In this case, we are transforming the case of the text obtained from the screen.
Finally, the addition of the 'render' attribute completes this example. The following listing shows the complete HTML template. Please, note the Handlebar for-each loop to generate all the menu buttons. Here, each created button will call the send() Javascript function included inside the HTML body.
Here is a Plunker version to test this step:
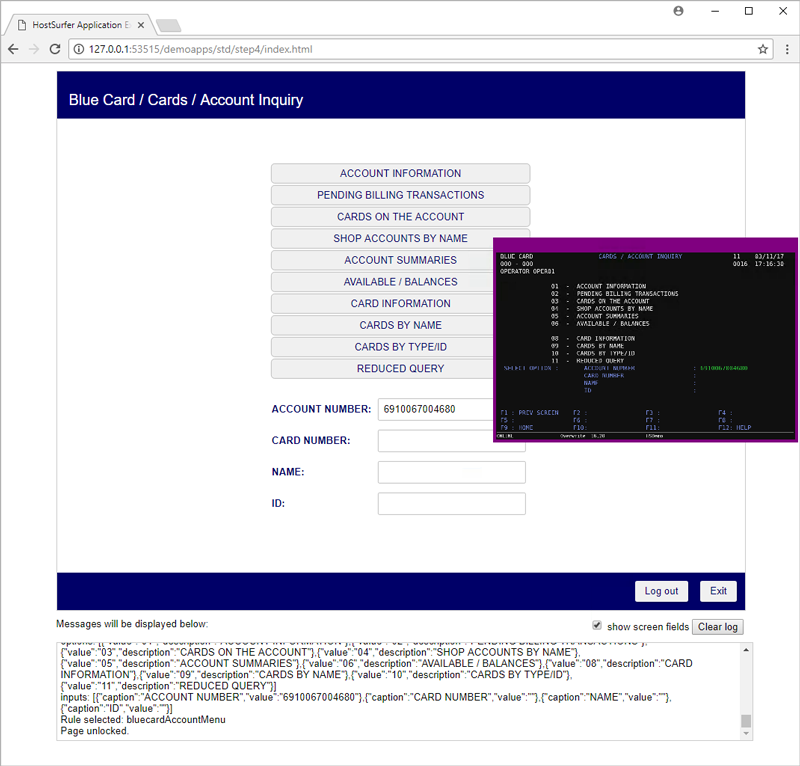
We are ready to navigate to the Account Menu. The final ouput for this view is the following: