To set up a ThinRDP Broker for the Load Balancing Architectures (ThinRDP Load Balancer or Combined Architecture), you may follow the steps below:
1. Install ThinRDP on the target machine.
2. Open the ThinRDP Manager and on the General Tab, check the option "Enable Load Balancing".
3. The Load Balancing tab will be activated. Open this tab.
4. Select the option "Connection Broker".
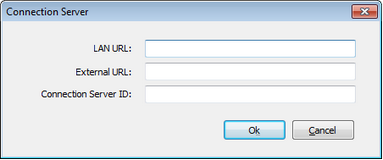
5. Click on the "Add" button to register a Connection Server that has been already installed and configured. The dialog below will be presented.

LAN URL |
Inform the URL to access the Connection Server from the Local Network. |
External URL |
Inform the URL to access the Connection Server from the outside the LAN (internet). |
Connection Server ID |
Inform the Connection Server ID generated while configuring the Connection Server. |
6. Repeat the step 5, for all existing Connection Servers.
7. Configure all the other settings (General, Security, Access Profiles1, Folders, Permissions and License) 2.
8. Press Apply.
Important observations:
1. If you will have more than one Broker on your environment (Combined Architecture), you will have to repeat all the steps above. However on step 7, it will not be necessary to configure all the Access Profiles again. From the second Broker on, you will only have to set the Profile Database to same path where the first Broker database is.
On the bottom of the Access Profiles tab, there is a field called "Database Path". All Brokers must have this field pointing to the same path, so that they can share the profiles while distributing connections .
2. It is recommended that if there is more that one Broker (Combined Architecture), they all have the same "Authentication Method", Temporary and Shared Folders Settings and Connection Server list. That way, the different brokers will establish connection evenly and keep all the Folders data centralized.