The Hyper-V virtual machine profile will be necessary when you can't access it through a direct IP address or computer name.
When this happens you can use the Hyper-V GUID to locate the virtual machine inside a Hyper-V Server.
Follow the next steps and learn how to configure a Hyper-V profile:
1. Add a new profile.
2. On the profile Computer field, inform the Hyper-V server name or IP address.

3. Check the option "Connect to a Hyper-V" Virtual Machine.
4. The credentials to be informed will be used to authenticate against the Hyper-V server.
5. If you know the Virtual Machine Id (GUID), inform it on the field "Virtual machine id" and skip the step 6.
6. If you don't know the Virtual Machine GUID, click on the "Browse" button and a search dialog will be presented:
6a. Click on the Connect button and the list of virtual machines located on the Informed Hyper-V server will be presented.
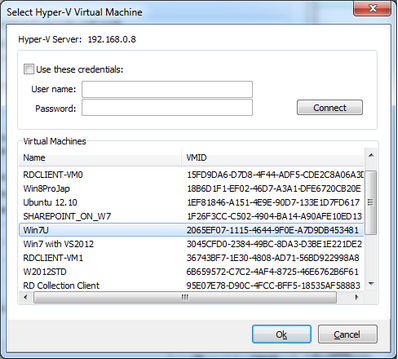
6b. If the Hyper-V server requires authentication you can enter the credentials on the "Use these credentials" box, and the press Connect.
6c. Once the Collection is selected you can double-click on it or click on the OK button.
6d. The virtual machine GUID will be set on the correspondent field.
7. The other profile settings should be configured like any regular profile (Display, Resources, Program, Experience, Advanced, Printer and Permissions).
8. Once you are done configuring the profile, press the OK button and then Apply the changes.