The Main Toolbar of the Telnet workspace consists of the following options. Each one of them will be detailed in this topic.
![]()
Connections section
|
Connect/Disconnect Use this button to connect or disconnect the active connection. |
|
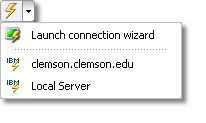
Click on the arrow to unfold a list of all existing connections. Select the 'Launch Connection Wizard' option to create a new connection. |
|
Duplicate active session Use this button to open another session of the current connection so you can browse them independently. |
Edit section
|
Copy Use this option to copy the selected text into the clipboard buffer and delete the selected text, all in a single step. |
|
Cut Use this option to copy the selected text into the clipboard buffer. |
|
Paste Use this option to paste text from the clipboard into the screen at the cursor position. |
|
Undo Paste Use this option to undo the last Paste operation. |
|
Delete Use this button to delete the selected text. |
Office Integration
|
Office Integration Select a Microsoft Office application from the list to export the selected text area. See the topic MS Office Integration for more information.
|
Macros section
|
Start Macro Recording Use this button to start recording a macro. |
|
Once pressed, this button will be replaced by the 'Stop Macro Recording' button. |
|
Stop Macro Recording Use this button to finish recording a macro. A dialog box will appear asking you for a macro name in order to save it. |
|
Once pressed, this button will be replaced by the 'Start Macro Recording' button. |
|
Play Macro Use this button to play a previously recorded macro. A list of all available macros will be unfolded. From this list you can also select the 'Edit' option which will launch the 'Active Script' dialog, allowing you to edit and debug macros. |
|
Once pressed, this button will be replaced by the 'Stop Macro Reproduction' button. |
|
Stop Macro Reproduction Use this button to interrupt the macro reproduction. |
|
Once pressed, this button will be replaced by the 'Play Macro' button. |
Navigators section
|
Navigator Wizard Use this button to launch the 'Navigator Wizard'. |
|
Run Navigator Select a Navigator to be run, from a list of all available Navigators for the current screen. |
Auto-fills section
|
Auto-fill Wizard Use this button to launch the 'Auto-fill Wizard'. |
|
Run Auto-fill Select an Auto-fill to be run, from a list of all available Auto-fills for the current screen. |
File Transfer section
|
IND$FILE File Upload Use this button to upload a file from your PC to the remote computer using either the IND$FILE, KERMIT, XMODE, ZMODE, YMODE or File Transfer (FTP) Protocol. The File Transfer Dialog will pop up with the transfer direction set to 'Send'. |
|
IND$FILE File Download Use this button to download a file to your PC from the remote computer using either the IND$FILE, KERMIT, XMODE, ZMODE, YMODE or File Transfer (FTP) Protocol. The File Transfer Dialog will pop up with the transfer direction set to 'Receive'. |
Print Screen
|
Print Screen Use this button to send a hard copy of the emulation screen to the printer. |
Miscellaneous section
|
Auto-Suggestion Use this button to turn the Auto-Suggestion feature on/off. |
|
Screen Styles Use this button to change the Screen Styles for the current emulation. |
Navigation section
|
Previous Screen Use this button to go to the previous screen of the current emulation. Click on the arrow to unfold the Screen History thumbnail panel. |
|
Next Screen Use this button to go to the next screen of the current emulation. Click on the arrow to unfold the Screen History thumbnail panel. |
|
Return to Active Screen Use this button to return to the active screen after consulting a screen from the Screen History. |
Full Screen
|
Full Screen Press this button to enter Full Screen Mode. |
Settings
|
Settings Use this button to display the general 'Settings' dialog. |
Help
|
Help Use this button to get access to this help file. |
Related Topics

